Now that we finished making the cupcakes in part 1 now we move on trying to replicate this guy.
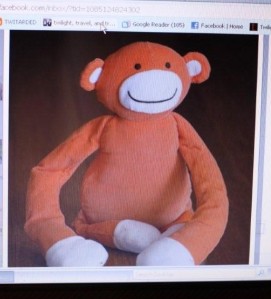 |
| Birthday boy's favourite stuffy |
Here's the final product.
 |
| Learn to make these |
First thing is that I had to figure out if these monkeys were intended for decoration only or for consumption. Fondant is for eating and gumpaste is for looking pretty. Also, I use toothpicks usually to hold the heads up so it's good to know ahead of time how easily it will need to be removed.
Gumpaste is what you normally see used to make those hard realistic leaves and flowers on cakes at weddings. You can roll and mold it into very fine and thin pieces and it will hold its shape. It dries out very quickly so usually I keep any pieces that I am saving to work on under a small bowl to keep them from drying out.
I use the Satin Ice brand because it comes in big tubs which are cheaper. For a beginner, you can buy gumpaste to start at Michael's and the price is good if you have a 40% off coupon from their email list. This stuff is technically edible but it is chewy, doesn't taste so great but it's a bit sweet, and frankly I don't think it's very good for your gastrointestinal system.
You can make flowers like these and there are lots of tutorials online.
 |
| gumpaste flowers from bakinguntilgolden.com |
Fondant is usually used to cover wedding and birthday cakes for a smooth finish. It is also good for figurine making but it takes longer to harden and it is harder to make small or thin pieces. If the figurines are intended for consumption then I'll use fondant instead of gumpaste.
Colouring gumpaste or fondant
Orange wiltons gel colouring added to the gumpaste with a toothpick - made the night before I plan to make my figurines so I can see the colour darken overnight and add any if I need to.
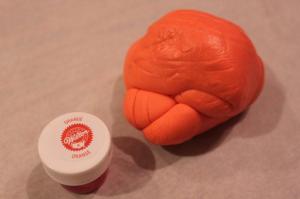 |
| Store gumpaste or fondant airtight in saran wrap overnight and in a tupperware to see the final colour as it deepens. |
Making the figurines
Using orange gumpaste we have just coloured and also white or a slight beige gumpaste I have already made.
I work on parchment paper which doesn't stick to the gumpaste.
I usually will make a sketch and then a trial figurine. Once I'm happy with the trial I'll weigh it so I can know how much gumpaste to allot for each piece.
Another way of making sure your limbs are even is to roll your gumpaste into a snake shape and then divide it evenly into the number of pieces you need. No weighing needed but visually super easy to do.
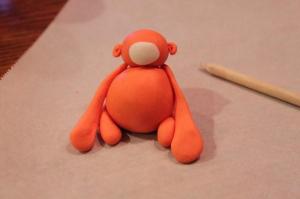 |
| First trial, hands are way too big |
Using fondant glue or just water with a very fine paintbrush to attach the parts. Fondant glue is a small piece of fondant dissolved with a few drops of water.
Parts include oval head, trapezoid body all made of orange plus 2 long arms, 2 short legs, and a tail all with white gumpaste blended in at the end. You take the long piece for your limb and at the end place a small piece of white (about the size of a piece of Nerd candy) and then roll them together a few times in your palm. The warmth will melt them together quite seamlessly.
The only tools I really use are my hands plus rounded and pointed toothpicks. Honestly the hardest part to do is putting on the ears and making sure they don't fall off.
I break a toothpick in half and stick it into the body first and then the head on top. Also remember to use some water or fondant glue under the head.
For the ears take a small orange ball and indent with rounded toothpick then place even smaller white ball inside and repeat with rounded toothpick. Pinch off the pointy tip and then stick the rounded ear onto the head, using glue or water as mentioned below and your toothpicks to apply pressure. My sister in law uses tweezers but I like using toothpicks and my fingers instead.
 |
| Final product isn't he cute? |
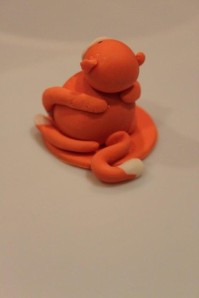 |
| See above for how to blend the white into the tail |
I use Wilton Edible Food Writers (food colouring pens) fine tip to draw on the eyes and mouth. This part makes me the most nervous because there is no easy redo unless you take the head off and do it all over again.
Here is the group of monkeys I made (it's about 3am by the time I'm finished - can't start until the kids are asleep).
 |
| About to attack |
I placed them all on disc of orange gumpaste and then onto squares of parchment paper.
Transport
This is the part that strikes fear into any baker. Even if you make it how do you get it there in one piece?
I pack all the figurines on parchment squares in individual gladware or tupper containers. Right before I load them into the car (after they have been drying at least overnight) I gently pack a bit of paper towel around each one to prevent shifting.
 |
| In gladware waiting for paper towel to be packed around each one to prevent shifting |
Then I load them onto a baking tray lined with a silpat (either use silicone or a wet towel to prevent slipping around in the car).
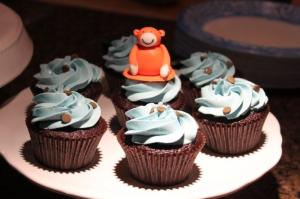
Onto the cupcakes I made in Part 1 of this post.
 |
| Fondant polka dots |
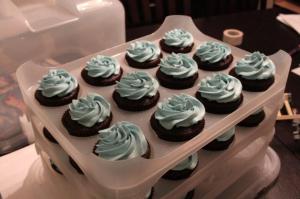
I use a Cupcake Courier and I love it. My sister in law/baking partner JL managed to find them at our local Winner's store (kind of like Ross but with household stuff in addition to clothes) for about $25 Cdn each - steal!
The only downside is there are no trays so far for mini cupcakes. I will have to use my cricut to cut out some plastic adapter sheets later on.
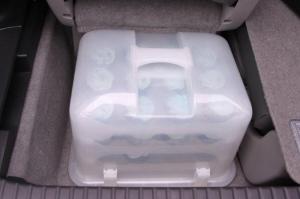
This handy thing fits perfectly in my trunk with one of the third row seats half folded.
Delivery and Set Up
Managing to slow way down around corners and trying to choose the least steep streets to my destination, I finally made it. Mad rush since the Olympic torch was coming down this street in less than 90 minutes and I wanted to be out of there before traffic got too busy.
I brought my ceramic cake stands for set up as well and birthday boy's mommy (who is also the sister of a long time friend) swore to keep my stands safe.
Final set up - Birthday Boy's mommy almost cried, like full on "this is just what I wanted" tears. That made staying up until 3:3oam totally worth it.
 |
| Monkey cupcakes finally done! |
I'll be updating my Flickr cupcake pics very soon and send out a shout when they're up.
Enjoy and let me know if you have questions.






11 comments:
OH MY GOODNESS!! The monkey's are sooooooo cute. Sooooo adorable. Soooooo I could never eat one. I want to cry they are so cute. You are amazing! It was totally worth staying up to make them and I am so glad the family was happy. Now I will go back and read all the text with this post - I was so overtaken with the cuteness of the monkeys!!!! I will eventually have to tell you how monkey's are such a part of my life but I have to get ready to go to a play today. Happy Valentine's Day!
Hi Dangrdafne. Let me know about the monkeys - I'm so curious about why they're so important. Please read the text for the post if you have time. I never know if they'll turn out cute or not so glad they worked.
I'm working on a gluten free cupcake and frosting review now too.
absolutely fantastic!
I AM SO INSPIRED!! I vow to make something like this (maybe a little less amazing for the first time..) maybe James & Ryan will take the boys for an afternoon and you can be my cupcake guru?
By the way, your little gumpaste monkeys look cuter than the stuffed animal monkey!
You, are super talented! I am speechless, Jenny. I mean, I'm sure as hell I could never make something like that. I don't have the precision it requires. Are you surgeon? :D
And the photos you take for your blog are super awesome too. I'm sorry I can't drop by every day, but I'm a bit swarmed at the moment.
That kitchen, btw, takes my breath away. It's birthday mommy's, isn't it?
Thanks Jelena. No surgeon hands here. Just a family doc although I did deliver babies until last year. Now I have time for more important things:)
I also enjoy taking photos but this one goes to the camera buying ability of my hubby. I also do baby portraits for friends so he bought me a new camera for mothers day last year. He bought himself a new lens for fathers day that cost more than the camera! So the camera makes the photos nice. In fact he's spent more on cameras than I have on twilight...
Btw yes the kitchen is birthday boys. They just moved to a brand new place and yes they gave a gorgeous house. I am jealous as well.
Thanks!
Hi Tara. Thanks! Glad you like them. I'd love to show you how to make these anytime. Or you can choose another stuffy to copy.
Wow! I'm impressed, fantastic cakes, no wonder your customer was so happy, I would have been too! Lovely post :o)
Those monkeys are adorable! I don't do a lot of figures (mostly because I'm lazy), but I probably should start practicing. It's suck when I get a cake order that needs figures and have a huge learning curve.
Do you like the Wilton color gel? I've tried it and the Americolor. I think I like the Americolor better, but it's hard to find in stores where I live. I have issues with the Wilton black.
Also, do you use the Satin Ice fondant? How does it taste? I've been using marshmallow fondant because I can just make it and it's cheap, but I'm starting to think I need to upgrade to something a little more polished. One of my cake friends makes buttercream fondant, so I'm going to give that a try soon, I think.
Post a Comment